An HVAC system controls temperature, humidity, and air quality. Over time, dust, dirt, and moisture collect inside the unit and ducts. This buildup restricts airflow, raises energy use, and reduces system efficiency. It also damage components and increase maintenance costs.
Professional HVAC cleaning removes all forms of buildup from inside the system. It helps air move freely, restores performance, and improves air quality. Regular professional cleaning for residential and commercial ducts also prevents allergies and ensures the system lasts longer.
Let’s have a look at step by step process of HVAC unit cleaning
HVAC Unit Cleaning Process
Step 1: Inspection and Assessment
The first step in professional HVAC cleaning is inspection. The technician carefully examines every part of the system, including ducts, air handler, blower motor, coils, filters, and drain lines. The goal is to find dirt accumulation, microbial growth, or blockages that restrict airflow.
The technician plans the cleaning method and identifies the right tools for each section. They also check for damaged or worn-out parts. This step helps them clean the system efficiently and completely. Without inspection, hidden areas may stay dirty, reducing the results of the entire service.
Step 2: Power Shutoff and Preparation
Before cleaning begins, the technician turns off power to the system. They disconnect it at the thermostat and circuit breaker to make sure it is safe to work. After confirming the system is off, they prepare the workspace. This may include opening panels, placing covers, and protecting nearby surfaces from dust or debris.
A well-prepared area helps prevent contamination and ensures the technician can move safely. It also protects the property and avoids spreading dust into other rooms.
Also read: When Should You Get Your Air Ducts Cleaned?
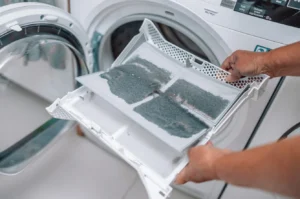
Step 3: Filter Removal and Cleaning or Replacement
The air filter is often the dirtiest part of an HVAC system. It traps dust and prevents it from entering deeper into the unit. During cleaning, the technician removes all filters and inspects their condition. Reusable filters are washed or vacuumed. Disposable filters are replaced with new ones that match the system’s rating.
A clean filter allows air to move freely through the system. It also keeps dust away from the blower and coil. Replacing filters on time helps maintain system efficiency between professional services.
Step 4: Cleaning the Indoor Unit
The indoor unit contains several key components that collect dirt. These include the blower motor, fan blades, evaporator coil, and drain pan. The technician removes the blower cover and cleans the motor housing and fan blades using soft brushes or vacuums. They ensure no debris is left inside the fan that could affect balance or performance.
Next, the evaporator coil is cleaned. Dirt on the coil reduces heat transfer and causes the system to work harder. The technician uses a coil cleaner or compressed air to remove buildup. Bent fins are straightened with a fin comb to restore proper airflow.
The drain pan and condensate line are cleaned and flushed. This prevents water accumulation and mold growth. After cleaning the entire indoor unit, the technician confirms that all internal parts are dry and free from debris.
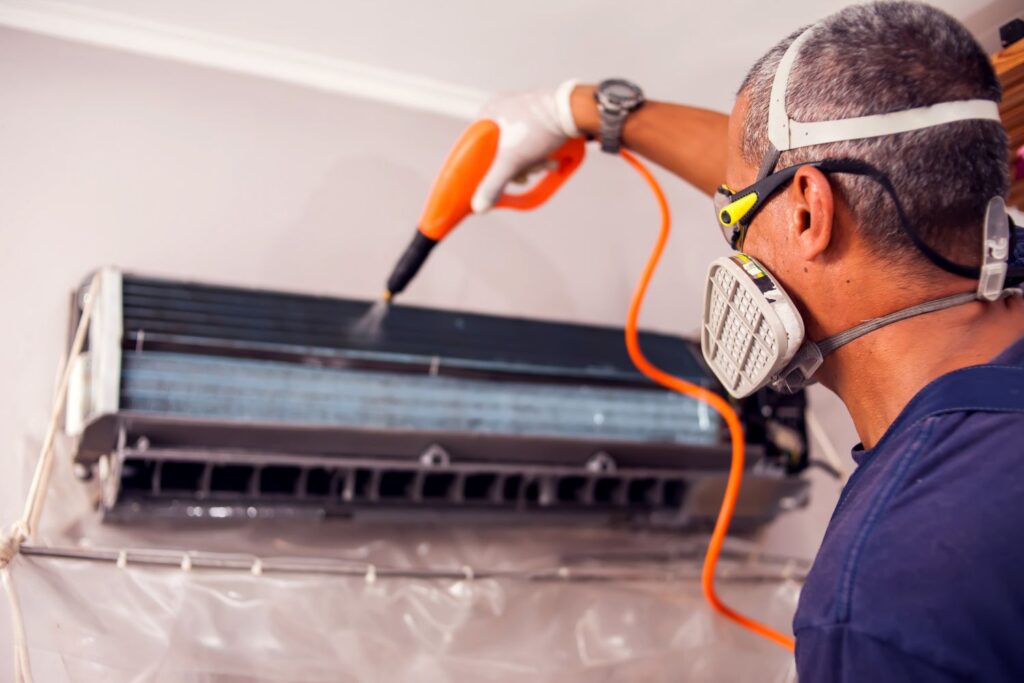
Step 5: Cleaning the Outdoor Unit
The outdoor condenser is exposed to dirt, leaves, and other particles. Over time, these block the airflow and reduce cooling efficiency. The technician first disconnects power to the outdoor unit. They remove the top grill and fan cover to access the condenser coil.
All visible debris inside and around the unit is cleared. The technician then cleans the coil using low-pressure water or a coil-cleaning solution. The process removes dust and pollen without damaging the delicate fins. If the fins are bent, they are carefully realigned for proper air circulation.
The technician also clears space around the condenser. Plants or objects too close to the unit are trimmed or moved to allow enough airflow. A clean and unobstructed outdoor unit ensures better performance and longer compressor life.
Step 6: Cleaning the Ductwork, Registers, and Grilles
The ductwork carries conditioned air throughout the building. Over time, dust and allergens accumulate on the inside walls of ducts. Cleaning them is essential for complete HVAC maintenance.
The technician removes registers and grilles, cleans them, and inspects the duct openings. Specialized tools such as rotating brushes or compressed-air whips are inserted into the ducts to loosen dirt. A powerful vacuum system with negative pressure then pulls out the loosened debris. This prevents dust from escaping into living spaces.
Once the ducts are clean, the technician checks for gaps, leaks, or damaged insulation. Proper sealing prevents dust re-entry and improves energy efficiency.
Step 7: Sanitization and Deodorization
After mechanical cleaning, sanitization may be necessary. The technician applies an approved disinfectant to the coil surfaces, drain pans, and ducts if there is evidence of microbial growth. This step kills bacteria, mold, and fungi that can cause odours or health issues.
If the system has lingering smells from moisture or smoke, a deodorizing agent may also be applied. These treatments remove odours and help maintain fresh indoor air. The technician ensures that all cleaning products meet safety and environmental standards.
Step 8: Reassembly and System Testing
Once all components are clean and dry, the technician reassembles the system. Panels, grilles, and covers are securely reattached. The system is then powered back on for testing.
During this step, the technician checks airflow, temperature difference between supply and return air, and system noise. They verify that the fan, compressor, and drain system function correctly. The technician ensures there are no vibrations or loose parts after reassembly.
This test confirms that cleaning did not disturb any mechanical or electrical connections. It also ensures the system is operating efficiently.
Step 9: Maintenance Advice and Future Scheduling
Professional cleaning is complete only when the customer understands how to maintain the system. The technician provides recommendations on how often to replace filters and how to keep the area around the outdoor unit clear. They also suggest an appropriate interval for the next service, typically once a year.
The technician may explain how to recognize signs of dirt buildup, such as reduced airflow, higher energy bills, or strange odours. Following this guidance keeps the HVAC system clean for longer periods and reduces the need for emergency repairs.
Step 10: Documentation and Review
Professional cleaning always ends with a written report. The technician documents all work performed, products used, and conditions found. The report includes before-and-after details and any observations that need attention in the future.
This documentation helps track the maintenance history of the HVAC system. It also provides proof of professional service, which can be valuable for warranty or insurance claims. Reviewing the report ensures the customer understands what was done and how the system improved.
Mistakes To Avoid During HVAC Unit Cleaning
Let me point out some traps that DIY or half-cleaned jobs often fall into, and why hiring a true professional gives you value.
- Cleaning just the filter and stopping: This leaves dirt in coils, ductwork, blower and may still impair performance. NADCA warns against cleaning only parts of the system.
- Using high-pressure washers on coils or fins: This can bend or damage fins, reduce heat transfer, and shorten system life.
- Neglecting ductwork: Even if coils and filters are clean, dirty ducts can re-contaminate the system.
- Not turning off power or using proper protective measures: Can lead to injuries, electrical damage or hidden debris spread into living spaces.
- No documentation: You won’t know what was done, which makes future service harder and less transparent.
In contrast, a professional cleaning ensures system efficiency, extends system life, improves indoor air quality, and protects your investment.
Also read: How Air Duct Cleaning Protects Your HVAC System?
Signs Your HVAC Unit Needs a Professional Clean
Before you hire someone, look out for these red flags. If you see any, schedule a professional cleaning.
- Reduced airflow from vents, or warm air when cooling should happen.
- Musty or rotten-egg type odors when system runs: may indicate mould or standing water in the system.
- Visible dust buildup on furniture soon after cleaning the house.
- Increase in energy bills without increased usage: system may be working harder because of dirt.
- Strange noise or vibration when the blower or condenser runs.
- Moisture or water leaks around the indoor unit or condensate pan.
If you notice one or more of these, get a full clean rather than a quick fix.
Benefits You’ll Get After a Proper Cleaning
Let’s summarise what you actually gain by going through the full process reliably.
- Improved system efficiency: Clean components transfer heat/cool more effectively, reducing energy use.
- Better indoor air quality: Less dust, allergens, mould spores circulating.
- Longer lifespan of your HVAC system: Less strain on components means lower risk of breakdowns and fewer repairs.
- Lower energy bills.
- Faster cooling or heating response because airflow is optimal.
- Fewer maintenance emergencies and less downtime.
- Peace of mind knowing the system has been thoroughly inspected and cleaned.
All of these add up to better comfort, lower costs, and fewer headaches.
A Quick Checklist for You to Use or Ask Your Technician
Here’s a handy checklist you can keep or use when talking to your technician:
- System power turned off before service
- Inspection of indoor and outdoor units and ductwork
- Air filter cleaned or replaced, correct rating confirmed
- Indoor blower/fan cleaned, drain pan cleared, evaporator coil cleaned and fins straightened
- Outdoor condenser unit cleaned, fins straightened, surrounding debris cleared
- Ductwork cleaning: registers removed, agitation and vacuuming done, ducts inspected for leaks or pests
- Sanitisation/deodorisation performed if required
- System re-assembled, power restored, operation tested
- Service report given: parts, chemicals, photos, findings, recommendations
- Next service interval recommended, maintenance tips provided
If any of these are missing, ask why. A professional should cover them all.
Professional Considerations for Commercial vs Residential Units
If you’re handling a large commercial HVAC unit, the process is similar but scaled. Professionals will:
- Use larger vacuums and more powerful negative-pressure systems for big duct runs.
- Check multiple zones, complex ductwork, large heat-exchanger surfaces.
- Coordinate with building management to schedule down time and ensure safe access.
- Follow more exact protocols because commercial systems often run 24/7 and any failure is more disruptive. For residential systems the same basic steps apply but are simpler. Regardless of size, the same principles hold: inspection, shut-off, filter, blower/coil, outdoor unit, ducts, sanitise, test, advise.
Safety Notes You Should Keep in Mind
Since your safety is important, here are a few safety-related reminders:
- Always ensure power is fully shut off before work begins.
- Avoid DIY coil cleaning with pressure washers or aggressive chemicals unless you know the system well.
- Make sure the technician uses EPA-approved disinfectants if sanitisation is done.
- Ensure that access panels are re-installed securely and wiring is untouched.
- Make sure outdoor unit work is done in safe weather conditions and the area around it is safe.
- Ask about how the technician will control dust and containment, especially if you have occupants or sensitive rooms.
Hire HVAC Unit Cleaning Experts Today
Professional HVAC unit cleaning is a main part of system maintenance. It improves efficiency, extends equipment life, and protects indoor air quality. If your HVAC unit cleaning is due, contact Accurate Duct Cleaning. We provide complete HVAC and air duct cleaning services. Our team is licensed and insured. They have the right tools and equipment to efficiently clean the unit to achieve the best results.
Call us now and schedule an appointment.